Introduction 00:00
We’ve already learned how to add physics to a Three.js project and as you might remember, it was quite tedious. We had to create the physics world separately from the Three.js world and for each object we wanted to add to the scene, we had to create a version in each one of the two worlds.
In this lesson, we are going to see how much easier this process gets when using R3F.
Also note that this lesson is quite big and might be a little bit boring because we have a lot of concepts to cover. But be reassured, in the next lesson we are going to put this knowledge into a funnier exercise.
From Cannon to Rapier 01:34
In the previous Physics lesson, we used Cannon.js to handle the physics part. Cannon is a great physics library, but the original code hasn’t been updated for many years. Fortunately, the PMNDRS team has been maintaining a fork of the code, called cannon-es and they’ve also implemented it in R3F (NPM, Github).
While cannon-es is a perfectly viable solution, there is a new challenger and its name is Rapier.
Rapier 02:31
Rapier was created in 2019. It’s written in Rust and works in JavaScript thanks to WebAssembly.
We are not going to go too much into detail concerning WebAssembly, but, in a nutshell, WebAssembly enables running languages like C/C++, C# and Rust on a webpage with almost native performance.
In other words, Rapier should be very performant and we don’t need to learn anything about WebAssembly or Rust. We can just use it.
The library is also “determinism”. By default, running the simulation with the same conditions will result in the same animation, even on multiple devices (https://rapier.rs/docs/user_guides/javascript/determinism).
Rapier has been developed by Dimforge:
And the physics library works for both 2D and 3D:
Rapier isn’t bound to Three.js and we can use it with any other library.
React Three Rapier 06:06
But what about Three.js and more specifically R3F?
The good news is that R3F already implements Rapier as React Three Rapier thanks to the PMNDRS team and more specifically thanks to Hugo Wiledal (@etthugo).
React Three Rapier is working beautifully, but be careful. As I’m writing this lesson, it is still under development and you might come across bugs and unfinished features. Those should be resolved with time and you might not even encounter them while following this lesson.
Even though we are going to force a very specific version of the library in order to minimise bugs, keep an eye on potential differences between the lesson and what you have on your screen.
If you’re struggling, don’t hesitate to ask for help on the Three.js Journey Discord server or even the PMNDRS server.
How to learn 07:18
We are going to learn Rapier with R3F together, but there are already some resources available and we are going to use the following documentation as references.
Rapier (without Three.js nor R3F)
- Documentation: https://rapier.rs/docs/user_guides/javascript/getting_started_js
- API: https://rapier.rs/javascript3d/index.html
As for learning Rapier in R3F, since the library is under development, there is no complete documentation available yet. Still, we have access to examples:
- Readme: https://github.com/pmndrs/react-three-rapier#readme
- Examples on React Three Fiber: https://docs.pmnd.rs/react-three-fiber/getting-started/examples (search for “rapier”)
Anyway, we are going to learn most of what we would need in this lesson.
Setup 07:46
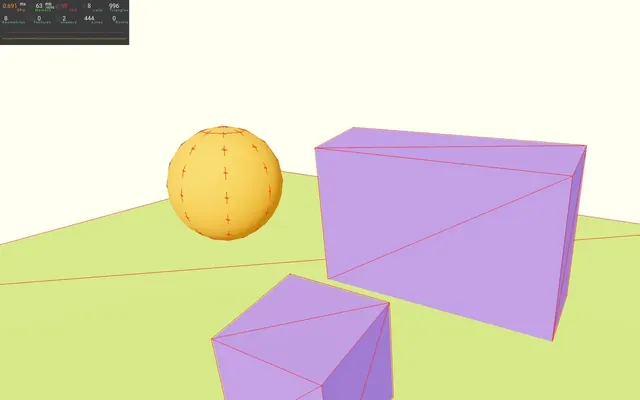
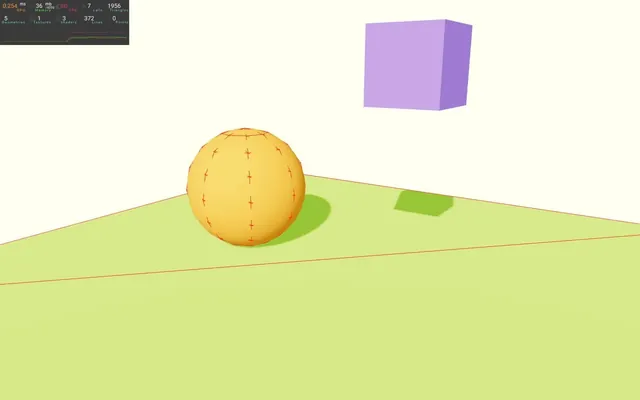
In the starter, we have the classic orange sphere, purple cube, and green floor:

As you can see, the sphere and the cube are a little higher than usual as if they were ready to fall.
The floor is also thicker. Physics engines aren’t very good when it comes to detecting collisions with thin objects.
We also have a directional light source and an ambient light source.
The @react-three/drei dependency is already installed within the project and we are using the OrbitControls helper to be able to move the camera around.
We also have <Perf /> from r3f-perf in order to keep an eye on performance.
Implementing 08:53
To add React Three Rapier to the project, from the terminal, run npm install @react-three/rapier@1.4 (we force the version to prevent surprises; you can ignore potential vulnerability warnings).
We are going to make the physics work with just a few changes in our code. It’s going to be quite fast, but we are going to go into detail right after this part.
<Physics>
First, in Experience.jsx, we need to import Physics from @react-three/rapier:
import { Physics } from '@react-three/rapier'We now need to add it in our JSX.
Since only objects inside the <Physics> tag will be impacted by the physics, we are going to add it around our 3 <mesh>:
export default function Experience()
{
    return <>

        {/* ... */}

        <Physics>

            <mesh castShadow position={ [ - 2, 2, 0 ] }>
                {/* ... */}
            </mesh>

            <mesh castShadow position={ [ 2, 2, 0 ] }>
                {/* ... */}
            </mesh>

            <mesh receiveShadow position-y={ - 1.25 }>
                {/* ... */}
            </mesh>

        </Physics>

    </>
}
<RigidBody>
Now, we need to specify which objects are going to be affected by the physics. To do that, we need to add a <RigidBody> around each object.
First, import RigidBody from @react-three/rapier:
import { RigidBody, Physics } from '@react-three/rapier'And now, we can add the <RigidBody> around our objects which we want to be subject to the physics.
Let’s start with the sphere:
<Physics>

    <RigidBody>
        <mesh castShadow position={ [ - 2, 2, 0 ] }>
            <sphereGeometry />
            <meshStandardMaterial color="orange" />
        </mesh>
    </RigidBody>

    {/* ... */}

</Physics>
And tada, the sphere is falling.
But obviously, it’s going straight through the floor since we didn’t add physics to our floor.
Let’s fix that and add a <RigidBody> around the floor, but we are also going to add a type attribute with the fixed value attached to it:
<Physics>

    {/* ... */}

    <RigidBody type="fixed">
        <mesh receiveShadow position-y={ - 1.25 }>
            <boxGeometry args={ [ 10, 0.5, 10 ] } />
            <meshStandardMaterial color="greenyellow" />
        </mesh>
    </RigidBody>

</Physics>
Note that a <RigidBody> can only be added inside the <Physics> element. Doing otherwise will result in an error.
Under the hood 12:49
As you can see, adding physics was really easy.
Here are a few things to notice:
- We don’t have to update the physics in each frame.
- Three.js objects are automatically associated with the corresponding
RigidBodysurrounding them. - React Three Rapier creates a physics shape that seems to match the Three.js objects.
- We don’t have to specify things like surface properties, object mass, gravity, etc.
From now on, you might need to reload the page after making changes. Updating the physics world on the run is quite a complex task and the Hot Module Reload is not perfectly supported yet.
Debugging 14:14
In order to see what is really happening in the Physics world, we are going to add a debug mode and it’s as simple as adding the debug attribute to <Physics>.
<Physics debug>

    {/* ... */}

</Physics>
As you can see, the physics version of our sphere is actually a box. Don’t worry, we are going to change that.
This debug mode is usually for development only. You can choose to remove it when you don’t need it anymore or you can make it optional if you are using a Debug UI like Leva.
Finally, those wireframes seem harmless, but they can actually have a huge impact on performance. A little later in the lesson, we are going to do a stress test and add hundreds of physics objects. We are going to optimise those objects in order to render them fast, but the debug versions are not going to be optimised.
Colliders 16:46
Colliders are the shapes that make up our RigidBodies. In the case of our sphere, you can see that the collider seems to be a box. It’s actually more of a cube since all the sides have the same size and the actual word used by Rapier for this shape is “cuboid”.
Automatic colliders
Cuboid collider
This cuboid was automatically generated by React Three Rapier.
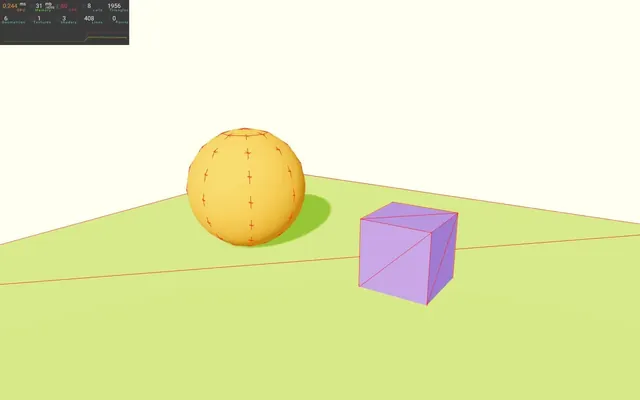
Let’s try on the purple cube. Wrap the cube <mesh> in a <RigidBody>:
<RigidBody>
    <mesh castShadow position={ [ 2, 2, 0 ] }>
        <boxGeometry />
        <meshStandardMaterial color="mediumpurple" />
    </mesh>
</RigidBody>
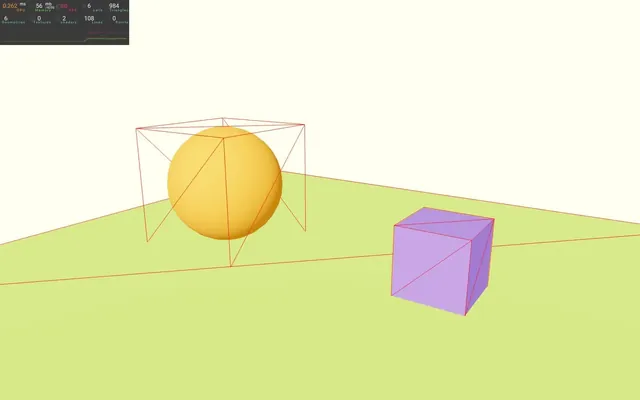
As you can see, this new cuboid matches our original cube perfectly.
Change the size of the <mesh> using the scale attribute to see if the collider matches:
<RigidBody>
    <mesh castShadow position={ [ 2, 2, 0 ] } scale={ 2 }>
        <boxGeometry args={ [ 2, 2, 2 ] } />
        <meshStandardMaterial color="mediumpurple" />
    </mesh>
</RigidBody>
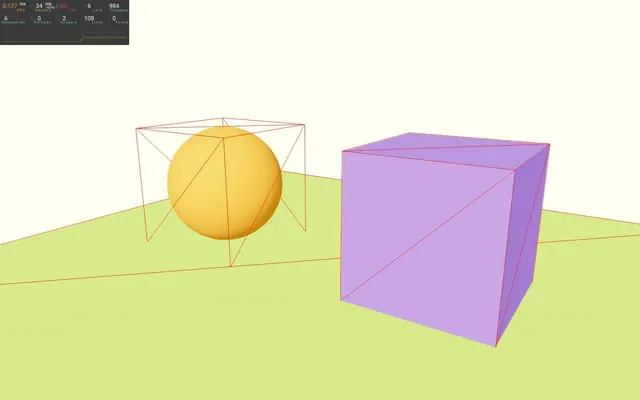
And we can even try on the <boxGeometry> instead of changing scale on the <mesh>:
<RigidBody>
    <mesh castShadow position={ [ 2, 2, 0 ] }>
        <boxGeometry args={ [ 2, 2, 2 ] } />
        <meshStandardMaterial color="mediumpurple" />
    </mesh>
</RigidBody>
The collider seems to always fit.
But what if we send a non-cubic shape?
<RigidBody>
    <mesh castShadow position={ [ 2, 2, 0 ] }>
        <boxGeometry args={ [ 3, 2, 1 ] } />
        <meshStandardMaterial color="mediumpurple" />
    </mesh>
</RigidBody>
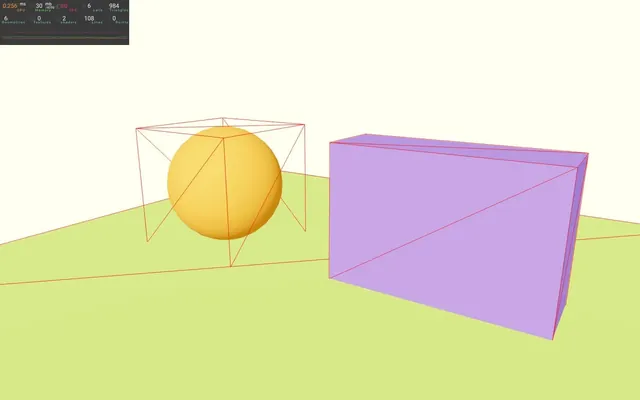
Yes, it’s still working.
Composed objects
Let’s try to break React Three Rapier and add a second <mesh> inside the <RigidBody> of the purple box:
<RigidBody>
    <mesh castShadow position={ [ 2, 2, 0 ] }>
        <boxGeometry args={ [ 3, 2, 1 ] } />
        <meshStandardMaterial color="mediumpurple" />
    </mesh>
    <mesh castShadow position={ [ 2, 2, 1 ] }>
        <boxGeometry args={ [ 1, 1, 1 ] } />
        <meshStandardMaterial color="mediumpurple" />
    </mesh>
</RigidBody>
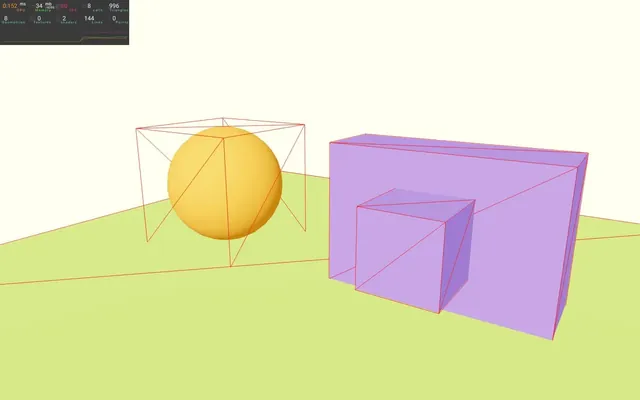
As you can see, React Three Rapier created a second collider for the second <mesh>. We still have one RigidBody, but it’s composed of multiple colliders.
Now try to move this new small cube a little further away from the initial box:
<RigidBody>
    <mesh castShadow position={ [ 2, 2, 0 ] }>
        <boxGeometry args={ [ 3, 2, 1 ] } />
        <meshStandardMaterial color="mediumpurple" />
    </mesh>
    <mesh castShadow position={ [ 2, 2, 3 ] }>
        <boxGeometry args={ [ 1, 1, 1 ] } />
        <meshStandardMaterial color="mediumpurple" />
    </mesh>
</RigidBody>
You can see that the colliders don’t need to be physically linked together to work as one complex body. Adding some weight away from the body also causes the object to fall on its side because the center of mass changes. Just like in real life.
Ball collider
Let’s get back to our sphere.
Because the default collider is a cuboid, it doesn’t match our sphere geometry.
It’s actually not necessarily a big deal and, sometimes you don’t need to have an accurate collider. People are used to having colliders that don’t exactly match the model, especially gamers. Most of the objects in my portfolio (https://bruno-simon.com) have a physics version that is only composed of boxes and it’s actually better for performance than accurate shapes.
Still, let’s try to fix it.
You can decide on what automatic collider you want to be used in the <RigidBody> with the colliders attribute. The default one is cuboid, but we can set it to ball.
Add the colliders (with an s) attribute to the <RigidBody> of the sphere and set it to ball:
<RigidBody colliders="ball">
    <mesh castShadow position={ [ - 2, 2, 0 ] }>
        <sphereGeometry />
        <meshStandardMaterial color="orange" />
    </mesh>
</RigidBody>
And as you can see from the debug version, we now have a physics shape matching our sphere very closely.
Hull collider
First, remove the cube <RigidBody> and what's inside.
Let’s make things a little more complicated. Now would be a good opportunity to try following instructions yourself:
Add a torus (or donut) with physics. Put that torus at the center of the scene, flat on the floor and make the ball fall on the torus, right from above.
Let’s do it together.
First, create a <RigidBody> with the torus inside (you can find the Torus geometry parameters in the Three.js documentation):
<RigidBody>
    <mesh castShadow position={ [ 0, 1, 0 ] }>
        <torusGeometry args={ [ 1, 0.5, 16, 32 ] } />
        <meshStandardMaterial color="mediumpurple" />
    </mesh>
</RigidBody>
Rotate the <mesh>:
<RigidBody>
    <mesh castShadow position={ [ 0, 1, 0 ] } rotation={ [ Math.PI * 0.5, 0, 0 ] }>
        <torusGeometry args={ [ 1, 0.5, 16, 32 ] } />
        <meshStandardMaterial color="mediumpurple" />
    </mesh>
</RigidBody>
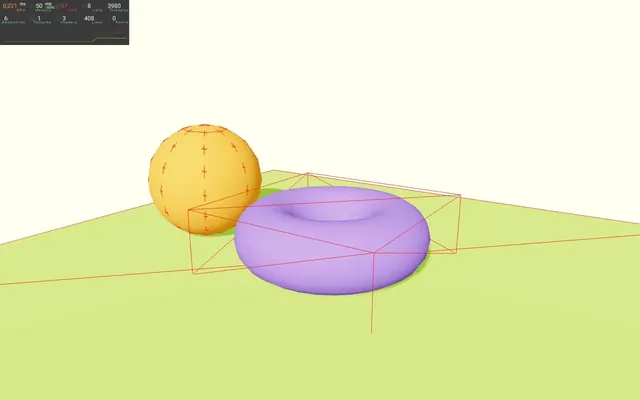
Instead of doing a half turn, let’s reduce the angle and move the torus towards the background. This way, we can test if the torus falls realistically. As a result, the sphere should fall right on top of it:
<RigidBody>
    <mesh castShadow position={ [ 0, 1, - 0.25 ] } rotation={ [ Math.PI * 0.1, 0, 0 ] }>
        <torusGeometry args={ [ 1, 0.5, 16, 32 ] } />
        <meshStandardMaterial color="mediumpurple" />
    </mesh>
</RigidBody>
Now, let’s put the sphere on top of it by changing its position:
<RigidBody colliders="ball">
<mesh castShadow position={ [ 0, 4, 0 ] }>
<sphereGeometry />
<meshStandardMaterial color="orange" />
</mesh>
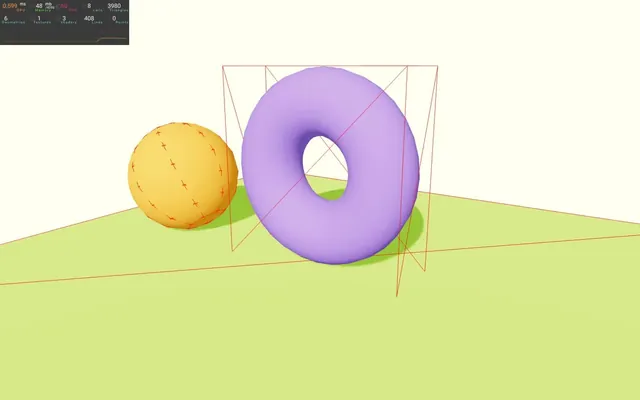
</RigidBody>We are set. The main issue here, as you can see, is that the torus collider is a cuboid and it prevents the torus from falling.
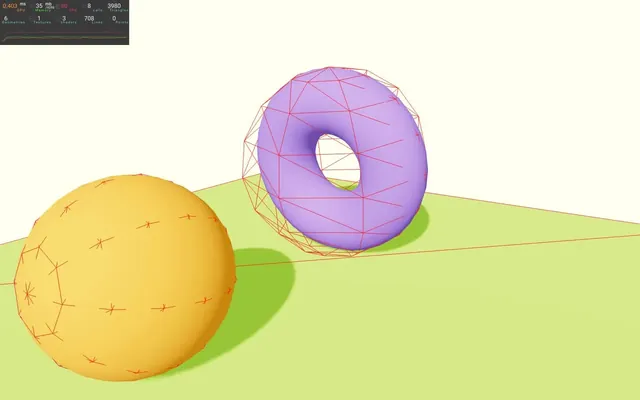
Let’s try with a ball instead:
<RigidBody colliders="ball">
    <mesh castShadow position={ [ 0, 1, - 0.25 ] } rotation={ [ Math.PI * 0.1, 0, 0 ] }>
        <torusGeometry args={ [ 1, 0.5, 16, 32 ] } />
        <meshStandardMaterial color="mediumpurple" />
    </mesh>
</RigidBody>
Not very convincing.
The shape of the torus is too specific and we need a custom collider.
And that’s where the hull collider comes to the rescue.
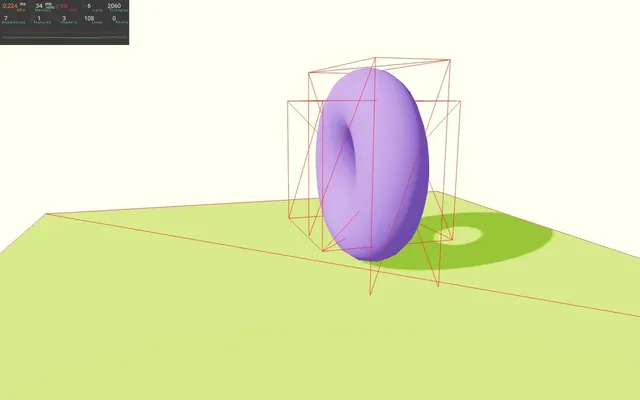
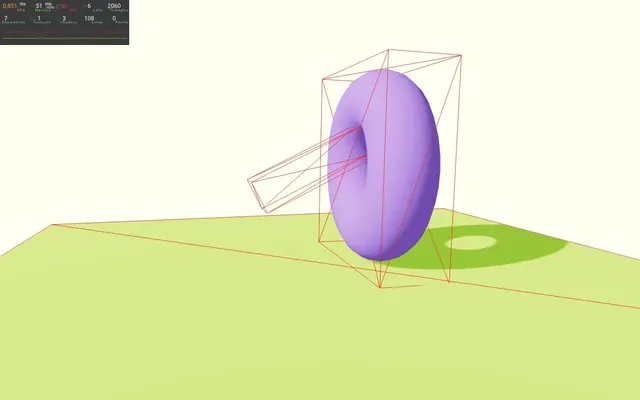
Replace the colliders attribute value by "hull":
<RigidBody colliders="hull">
    <mesh castShadow position={ [ 0, 1, - 0.25 ] } rotation={ [ Math.PI * 0.1, 0, 0 ] }>
        <torusGeometry args={ [ 1, 0.5, 16, 32 ] } />
        <meshStandardMaterial color="mediumpurple" />
    </mesh>
</RigidBody>
And now, things seem to fall in a more physically accurate manner.
The hull should actually be called a “convex hull”. Imagine that you put an elastic membrane all around the object. It fits the shape very closely but holes in that shape are ignored.
And it’s actually why the ball doesn’t fall inside the hole of the torus.
By the way, don’t be fooled by the debug shape you can see. It’s the base geometry used to create the hull and not the actual hull geometry.
It hardly takes any time to create hulls and they work like any other shapes. Also note that they are less performant than a cuboid or a ball.
Trimesh collider
But what if we really wanted our ball to fall into our torus hole? As if it were the basket of a basketball pole.
In that case, a good solution would be to use a triangle mesh (or trimesh in React Three Rapier).
Change the colliders attribute to "trimesh":
<RigidBody colliders="trimesh">
    <mesh castShadow position={ [ 0, 1, - 0.25 ] } rotation={ [ Math.PI * 0.1, 0, 0 ] }>
        <torusGeometry args={ [ 1, 0.5, 16, 32 ] } />
        <meshStandardMaterial color="mediumpurple" />
    </mesh>
</RigidBody>
And now the ball falls right inside the hole.
So why don’t we go ahead and use trimesh then?
Well, there is a catch. You should avoid using trimesh with dynamic RigidBodies (dynamic objects are the ones falling like the sphere and the torus).
The reason, as explained in the Rapier documentation, is that colliders generated with a trimesh are empty on the inside and it makes collision detection more complicated and prone to bugs. A fast object might get through the trimesh or end up stuck on its surface.
This doesn’t mean that you can’t use it, but, preferably, you should use it on fixed RigidBodies. Otherwise, you should expect some bugs.
Custom colliders
We’ve seen that React Three Rapier handles automatic colliders really well, but sometimes, we want to create our own collider or even a composition of custom colliders.
For the sake of learning, we are going to create colliders on the torus that don’t match the shape of the geometry.
First, we need to tell React Three Rapier not to generate the automatic collider by setting the colliders attribute to false on the torus <RigidBody>:
<RigidBody colliders={ false }>
    <mesh castShadow position={ [ 0, 1, - 0.25 ] } rotation={ [ Math.PI * 0.1, 0, 0 ] }>
        <torusGeometry args={ [ 1, 0.5, 16, 32 ] } />
        <meshStandardMaterial color="mediumpurple" />
    </mesh>
</RigidBody>
The ball should go through the torus.
Below, we are going to list the available colliders. Since React Three Rapier implements Rapier’s colliders, we can use the Rapier documentation as a reference for the various parameters:
BallColliderhttps://rapier.rs/javascript3d/classes/Ball.htmlCuboidColliderhttps://rapier.rs/javascript3d/classes/Cuboid.htmlRoundCuboidColliderhttps://rapier.rs/javascript3d/classes/RoundCuboid.htmlCapsuleColliderhttps://rapier.rs/javascript3d/classes/Capsule.htmlConeColliderhttps://rapier.rs/javascript3d/classes/Cone.htmlCylinderColliderhttps://rapier.rs/javascript3d/classes/Cylinder.htmlConvexHullColliderhttps://rapier.rs/javascript3d/classes/ConvexPolyhedron.htmlTrimeshColliderhttps://rapier.rs/javascript3d/classes/TriMesh.htmlHeightfieldColliderhttps://rapier.rs/javascript3d/classes/Heightfield.html
CuboidCollider
Let’s try one that we already know.
First, import CuboidCollider from @react-three/rapier:
import { CuboidCollider, RigidBody, Physics } from '@react-three/rapier'Then, add it to the <RigidBody> of the torus with the following parameters (we can add it anywhere in the <RigidBody>):
<RigidBody colliders={ false }>
    <CuboidCollider args={ [ 1, 1, 1 ] } />
    {/* ... */}
</RigidBody>
We get the cuboid, but it’s far from perfect.
First of all, we set the args to [ 1, 1, 1 ]. Those are the values of what we call the half extent and we can find those parameters in the constructor section of the Cuboid class documentation: https://rapier.rs/javascript3d/classes/Cuboid.html#constructor
A half extent is half of the width (on the x axis), half of the height (on the y axis) and half of the depth (on the z axis).
You can try to change them a little to roughly match the shape of the torus:
<CuboidCollider args={ [ 1.5, 1.5, 0.5 ] } />

But as you can see, the collider isn’t positioned on the torus and, even worse, the collider isn’t rotated while the torus is.
There’s a quick fix to that. Instead of setting the position and the rotation on the <mesh>, we can set them on the <RigidBody>:
<RigidBody colliders={ false } position={ [ 0, 1, - 0.25 ] } rotation={ [ Math.PI * 0.1, 0, 0 ] }>
    <CuboidCollider args={ [ 1.5, 1.5, 0.5 ] } />
    <mesh castShadow>
        {/* ... */}
    </mesh>
</RigidBody>
The way <RigidBody> and <mesh> work regarding position and rotation is very similar.
Be careful though, as scale isn’t supported.
Multiple colliders
We can still have multiple colliders.
Add another <CuboidCollider>:
<RigidBody colliders={ false } position={ [ 0, 1, - 0.25 ] } rotation={ [ Math.PI * 0.1, 0, 0 ] }>
    <CuboidCollider args={ [ 1.5, 1.5, 0.5 ] } />
    <CuboidCollider args={ [ 1, 1, 1 ] } />
    {/* ... */}
</RigidBody>
Move the new <CuboidCollider> with the position attribute and rotate it with the rotation attribute:
<RigidBody colliders={ false } position={ [ 0, 1, - 0.25 ] } rotation={ [ Math.PI * 0.1, 0, 0 ] }>
    <CuboidCollider args={ [ 1.5, 1.5, 0.5 ] } />
    <CuboidCollider args={ [ 0.25, 1, 0.25 ] } position={ [ 0, 0, 1 ] } rotation={ [ - Math.PI * 0.35, 0, 0 ] } />
    {/* ... */}
</RigidBody>
BallCollider
Let’s try another easy collider.
Import BallCollider from @react-three/rapier
import { BallCollider, CuboidCollider, RigidBody, Physics } from '@react-three/rapier'Use it instead of the two <CuboidCollider>:
<RigidBody colliders={ false } position={ [ 0, 1, - 0.25 ] } rotation={ [ Math.PI * 0.1, 0, 0 ] }>
    <BallCollider args={ [ 1.5 ] } />
    {/* ... */}
</RigidBody>
No surprise here. The only parameter is the radius of the ball, as you can read in the documentation of the Ball class.
But what about the subdivision?
There is actually no subdivision because Rapier handles the ball with maths and not a bunch of triangles.
And yes, while it’s true that the debug version we see has triangles, it’s only a visual representation.
Other colliders
We are not going to test all the other colliders because it would be boring, but we are going to talk about them quickly.
You can also find an overview that explains some of the available classes on the Rapier documentation: https://rapier.rs/docs/user_guides/bevy_plugin/colliders#overview
Feel free to test them if you want.
RoundCuboidCollider
The RoundCuboidCollider is like the CuboidCollider but with round edges.
CylinderCollider
The CylinderCollider is (no surprise there) a cylinder. Be careful with the first parameter because it’s not the height, it’s half the height.
CapsuleCollider
The CapsuleCollider has a very specific shape. You can consider it like a cylinder with the top and bottom being spheres.
The parameters are the same as the CylinderCollider.
ConeCollider
The ConeCollider is a simple cone.
ConvexHullCollider
The ConvexHullCollider is the equivalent of the hull that we generated automatically earlier. If you want to instantiate it yourself, you’ll have to provide the vertices and you can do that from the Three.js vertices of a geometry. It has to be a Float32Array.
TrimeshCollider
The TrimeshCollider is the equivalent of the trimesh that we generated automatically earlier and it works like the ConvexHullCollider.
HeightfieldCollider
Finally, the HeightfieldCollider can be used to create terrains. You need to provide a Float32Array containing all the elevation values and providing the number of cols and rows. Rapier will generate a grid according to those values and you can scale it with the fourth parameter.
It’s very useful to generate terrains.
The difference with a trimesh is that we only provide one value per vertex: the elevation. It’s more performant in terms of memory.
Note that you can’t have holes in this grid and that you won’t be able to generate caves.
Access the body and apply forces 45:54
There will be moments where you’ll want to call specific instructions on the bodies. Like if it’s a platform game, you’ll want the player to jump when the user presses the Space key.
As an example, we are going to make the purple cube jump when we click on it.
First, comment or remove the torus and its <RigidBody>, put back the initial cube with the automatically generated collider (try to write it yourself if you feel like practicing) and move the orange sphere on the left as it was before:
<RigidBody colliders="ball" position={ [ - 1.5, 2, 0 ] }>
    <mesh castShadow>
        <sphereGeometry />
        <meshStandardMaterial color="orange" />
    </mesh>
</RigidBody>

<RigidBody position={ [ 1.5, 2, 0 ] }>
    <mesh castShadow>
        <boxGeometry />
        <meshStandardMaterial color="mediumpurple" />
    </mesh>
</RigidBody>
Reference and impulse
Because we want to apply forces on the cube, we need a reference.
Import useRef from react:
import { useRef } from 'react'Create a cube reference:
export default function Experience()
{
    const cube = useRef()

    // ...
}
Add it to the cube <RigidBody>:
<RigidBody ref={ cube } position={ [ 1.5, 2, 0 ] }>
    {/* ... */}
</RigidBody>
First, let’s trigger a function when we click on the <mesh>. Now is a good opportunity to try to do it yourself.
In Experience, create a cubeJump function:
export default function Experience()
{
    const cube = useRef()

    const cubeJump = () =>
    {
        console.log('jump!')
    }

    // ...
}
Send this function to the onClick attribute of the <mesh> corresponding to the cube:
<RigidBody ref={ cube } position={ [ 1.5, 2, 0 ] }>
    <mesh castShadow onClick={ cubeJump }>
        {/* ... */}
    </mesh>
</RigidBody>
As you can see, the event system that we’ve learned is still working and we can listen to click events on the <mesh> as usual.
In the cubeJump, log the cube reference and click on it:
const cubeJump = () =>
{
    console.log(cube.current)
}
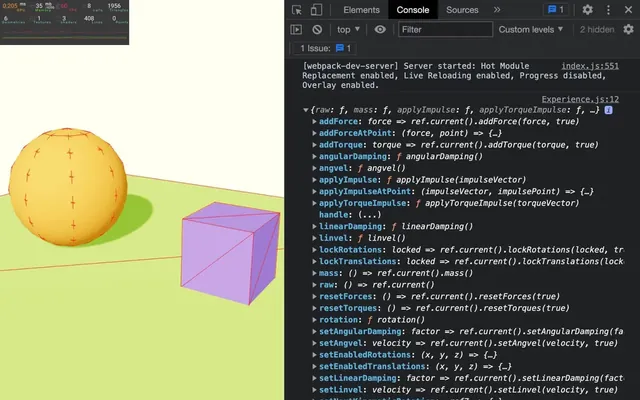
As you can see, the reference is the actual RigidBody from Rapier and we can use any of the methods available in the class: https://rapier.rs/javascript3d/classes/RigidBody.html
You should pause the lesson for a moment and check all the available methods. Don’t worry if you don’t understand everything. The goal is to have an idea about what can be done with the RigidBody.
For example, it seems that we can apply “forces”, but also something called “impulse”. We also can tweak the “gravity” for this specific object. We can change its “mass”, test if the object is moving, test if it’s sleeping, etc.
Great, but let’s get back to our initial goal and make that cube jump. We have the choice between addForce and applyImpulse.
Without going too much into detail, addForce is used to apply a force that lasts for quite a long time (like the wind), while applyImpulse is used to apply a short force for a very short period of time (like for a projectile).
To make something jump, we’d better use applyImpulse.
applyImpulse needs a Vector 3 as a parameter, which is going to be the direction of the impulse, while its length will be used as the strength.
We don’t need to create a Vector 3 using a class and we can just create an object with x, y and z properties:
In the cubeJump, call applyImpulse on the cube.current reference and send it a vector going upward (positive y):
const cubeJump = () =>
{
    cube.current.applyImpulse({ x: 0, y: 5, z: 0 })
}
Click on the cube to see it jump:
Now let see how we can rotate it.
The keyword for a rotation is torque and, if you check the RigidBody documentation, you’ll find both a addTorque (equivalent of addForce) and a applyTorqueImpulse (equivalent of applyImpulse). Let’s use the applyTorqueImpulse.
As a parameter, we need to provide a Vector 3, which works like an Euler. If we set the x and z to 0 but the y to something else than 0, the cube will rotate like a carousel:
const cubeJump = () =>
{
    cube.current.applyImpulse({ x: 0, y: 5, z: 0 })
    cube.current.applyTorqueImpulse({ x: 0, y: 1, z: 0 })
}
Instead of this regular rotation, we can add randomness with Math.random() on all 3 axes:
const cubeJump = () =>
{
    cube.current.applyImpulse({ x: 0, y: 5, z: 0 })
    cube.current.applyTorqueImpulse({ x: Math.random() - 0.5, y: Math.random() - 0.5, z: Math.random() - 0.5 })
}
Having the cube jumping on click is the perfect opportunity to test some of the properties we can tweak.
Object settings 56:10
We have many ways to control the behaviour of our objects and how they interact with each other. We can control the friction, the restitution, the mass, the gravity, where the objects are, where they are supposed to go, and much more.
Gravity
By default, the gravity is set to simulate earth gravity (near -9.81). We can change that directly on <Physics> by sending an array of 3 values to the gravity attribute:
<Physics debug gravity={ [ 0, - 1.6, 0 ] }>These settings represent the gravity on the moon.
As you can see, objects are falling much slower, and clicking on the cube will make it jump much higher.
The 3 values correspond to the x, y and z. Although it’s not very common, we can also invert gravity:
<Physics debug gravity={ [ 0, 1.6, 0 ] }>Or to the sides:
<Physics debug gravity={ [ - 1.6, 0, 0 ] }>Let’s get back to the earth gravity:
<Physics debug gravity={ [ 0, - 9.81, 0 ] }>There is also a way to specify a gravity scale for each object.
Set the gravityScale attribute to 0.2 on the <RigidBody> of the cube:
<RigidBody ref={ cube } position={ [ 1.5, 2, 0 ] } gravityScale={ 0.2 }>
    {/* ... */}
</RigidBody>
This can be very useful if you want to imitate air friction or a balloon made of helium.
You can even pass a negative value:
<RigidBody ref={ cube } position={ [ 1.5, 2, 0 ] } gravityScale={ - 0.2 }>
    {/* ... */}
</RigidBody>
Farewell, little cube.
Let’s get back to earth:
<RigidBody ref={ cube } position={ [ 1.5, 2, 0 ] } gravityScale={ 1 }>
    {/* ... */}
</RigidBody>
Though we are not going to test it, you can also change the gravity at run time.
Imagine a scenario where you are on board a spaceship. Suddenly, you are being attacked and the gravity field breaks down. You just need to tweak the gravity attribute on <Physics> to get the whole crew and objects floating around.
Restitution
Our objects don’t seem to bounce a lot which is a bit boring.
We can control the bounciness with the restitution attribute and the default value is 0, meaning that it doesn’t bounce.
Set the restitution attribute to 1 on the <RigidBody> of the cube:
<RigidBody
    ref={ cube }
    position={ [ 1.5, 2, 0 ] }
    gravityScale={ 1 }
    restitution={ 1 }
>
    {/* ... */}
</RigidBody>
The cube seems to bounce more, but shouldn’t a restitution of 1 make it bounce back to its initial position?
No, because the floor doesn’t have a restitution of 1. Imagine dropping a bouncing ball on a flat and solid surface: it will bounce strongly. Now imagine dropping that same bouncing ball on a carpet: it won’t bounce much.
If you want to see it bounce more, set the restitution attribute of the floor <RigidBody> to 1:
<RigidBody
    ref={ cube }
    position={ [ 1.5, 2, 0 ] }
    gravityScale={ 1 }
    restitution={ 1 }
>
    {/* ... */}
</RigidBody>

<RigidBody type="fixed" restitution={ 1 }>
    {/* ... */}
</RigidBody>
By default, Rapier will take an average of the two restitution of the objects involved. It is possible to change that rule, but it has to be done within the Collider itself and not the RigidBody.
This means that you need to access the automatically generated collider through a reference on the <RigidBody> or create the Collider manually.
You’ll also have to import CoefficientCombineRule from Rapier and choose one of the rules provided in that object.
We are not going to cover that here.
Friction
Friction works like restitution and lets us decide how much the surfaces are supposed to rub off on each other. If the friction is high, the object will stop fast and if the friction is low, the object will slide.
We can control it with the friction attribute and the default value is 0.7.
First, return the restitution value to 0 on the cube and floor <RigidBody>. Otherwise, we won’t be able to see the friction perform its intended task:
<RigidBody
    ref={ cube }
    position={ [ 1.5, 2, 0 ] }
    gravityScale={ 1 }
    restitution={ 0 }
>
    {/* ... */}
</RigidBody>

<RigidBody type="fixed" restitution={ 0 }>
    {/* ... */}
</RigidBody>
Now add a friction attribute to both of those <RigidBody> and set their values to 0:
<RigidBody
    ref={ cube }
    position={ [ 1.5, 2, 0 ] }
    gravityScale={ 1 }
    restitution={ 0 }
    friction={ 0 }
>
    {/* ... */}
</RigidBody>

<RigidBody
    type="fixed"
    restitution={ 0 }
    friction={ 0 }
>
    {/* ... */}
</RigidBody>
Click on the cube to give it a little jump and swing:
Again, by default, Rapier will take an average of the two friction involved. It is possible to change that rule, but it has to be done within the Collider itself and not within the RigidBody like for the restitution. You’ll also have to import CoefficientCombineRule from Rapier and we are not going to cover that here.
Return the friction value to 0.7 on both <RigidBody>:
<RigidBody
    ref={ cube }
    position={ [ 1.5, 2, 0 ] }
    gravityScale={ 1 }
    restitution={ 0 }
    friction={ 0.7 }
>
    {/* ... */}
</RigidBody>

<RigidBody
    type="fixed"
    restitution={ 0 }
    friction={ 0.7 }
>
    {/* ... */}
</RigidBody>
Mass
The mass of the RigidBody is automatically calculated as the sum of the masses of the Colliders that make up the RigidBody. The mass of the Colliders is automatically calculated according to their shape and volume.
In other words big objects will automatically have a bigger mass.
Still, we are going to learn how to access and modify it.
Note that, contrary to popular belief, the mass won’t change how fast an object falls. If we add notions like air friction, then its velocity might be affected, but that’s not the case here.
However, the mass will influence the forces involved. If two objects collide while one has a huge mass and the other one has a small mass, the huge mass will push away the small mass.
Setting the mass
The default mass seems to work just fine, but what if we want to change it? You don’t want a metal box to react like a cardboard box, right?
As we mentioned earlier, the mass of the RigidBody is calculated as the sum of the masses of the Colliders that compose it. This means that we need to create the Collider ourselves in order to change their mass.
First, make sure that you still have the CuboidCollider imported.
Then, set the colliders attribute of the cube <RigidBody> to false:
<RigidBody
    ref={ cube }
    position={ [ 1.5, 2, 0 ] }
    gravityScale={ 1 }
    restitution={ 0 }
    friction={ 0.7 }
    colliders={ false }
>
    {/* ... */}
</RigidBody>
And create add a <CuboidCollider> in the <RigidBody>:
<RigidBody
    ref={ cube }
    position={ [ 1.5, 2, 0 ] }
    gravityScale={ 1 }
    restitution={ 0 }
    friction={ 0.7 }
    colliders={ false }
>
    {/* ... */}
    <CuboidCollider args={ [ 0.5, 0.5, 0.5 ] } />
</RigidBody>
We are back to the same result and the mass of the collider has been automatically calculated again. If you click on the cube, it should jump as high as before.
But now, we can control its mass.
Set the mass attribute on the <CuboidCollider> to 0.5:
<CuboidCollider mass={ 0.5 } args={ [ 0.5, 0.5, 0.5 ] } />If you click on it, you’ll notice that it jumps twice as high.
And you can obviously achieve the opposite result with a higher mass:
<CuboidCollider mass={ 2 } args={ [ 0.5, 0.5, 0.5 ] } />If you click on it, the cube won’t go very high.
Accessing the mass
Since the mass is higher, the force we apply on click isn’t strong enough.
For the sake of learning, we would like to adapt the strength of the impulse according to the mass of the object so that it jumps to the same height regardless of the mass.
In other words, the higher the mass, the stronger the impulse.
To do that, we are going to retrieve the mass and use it on the applyImpulse.
In the cubeJump function, retrieve the mass with the mass method:
const cubeJump = () =>
{
    const mass = cube.current.mass()
    console.log(mass)

    // ...
}
You can now multiply the vector value we send to the applyImpulse method:
const cubeJump = () =>
{
    const mass = cube.current.mass()

    cube.current.applyImpulse({ x: 0, y: 5 * mass, z: 0 })
    // ...
}
The strength of the impulse is now proportional to the mass.
Position and rotation
As we’ve seen earlier, we can change the position and rotation of the <RigidBody> through their position and rotation attributes.
Be careful, for dynamic and fixed objects (the two types of objects we’ve covered), you should not change those values at run time. Their purpose is only to set the original position and rotation before letting Rapier update the objects.
Changing those values at run time is equivalent to teleporting the object and might result in weird behaviour and bugs.
If you want to move an object, you have to apply forces to it. For example, you can use addForce or applyImpulse as we’ve seen earlier.
If you really need update the object position and rotation directly, there are two options:
- If you need to move it just once, you can do it with the appropriate methods, but you’ll have to reset velocities that are currently applied on it and also make sure to not move it inside another
RigidBody. We won’t see that here because we will do it in the next lesson. - If you need to move it in time, like a carousel or a moving obstacle, you can use the
kinematictypes that we are going to discover now.
Kinematic type
We’ve already covered fixed objects (the floor) and dynamic objects (the ball and the cube).
fixed objects won’t move while dynamic objects will move, will be subject to gravity, forces, etc.
And as we’ve pointed out earlier, changing the position and the rotation of an object is a bad idea and is equivalent to teleporting it.
But what if we really want to have an object that we can move and rotate? It can be the player or it can be a carousel and we don’t want to use unpredictable forces. We want them to move and rotate at an exact speed.
And that’s exactly the purpose of the kinematicPosition and kinematicVelocity types.
The difference between the kinematicPosition and the kinematicVelocity is how we update them.
For the kinematicPosition, we provide the next position and it’ll update the object velocity accordingly.
For the kinematicVelocity, we provide the velocity directly.
Let’s create a long red box going in circles on the floor while rotating on itself. We are going to call it twister and use the kinematicPosition type:
<Physics debug gravity={ [ 0, - 9.81, 0 ] }>

    {/* ... */}

    <RigidBody
        position={ [ 0, - 0.8, 0 ] }
        friction={ 0 }
        type="kinematicPosition"
    >
        <mesh castShadow scale={ [ 0.4, 0.4, 3 ] }>
            <boxGeometry />
            <meshStandardMaterial color="red" />
        </mesh>
    </RigidBody>

</Physics>
Since we are going to change its position ourselves, we need a reference to it.
Make sure that you still have useRef imported and then create a twister reference:
export default function Experience()
{
    const twister = useRef()

    // ...
}
Associate it with the <RigidBody> using the ref attribute:
<RigidBody
    ref={ twister }
    position={ [ 0, - 0.8, 0 ] }
    friction={ 0 }
    type="kinematicPosition"
>
    {/* ... */}
</RigidBody>
Since we are going to change its position and rotation on each frame, we are going to use useFrame.
Import useFrame from @react-three/fiber:
import { useFrame } from '@react-three/fiber'And use it in the Experience:
export default function Experience()
{
    // ...

    useFrame(() =>
    {

    })

    // ...
}
The kinematic object has two important functions:
setNextKinematicTranslationto move the object.setNextKinematicRotationto rotate the object.
We are going to start by making it rotate.
As always, we want the animation to be time-based so that it looks the same on every device regardless of the frame rate.
To do that, we need to retrieve the elapsed time since the experience started and we are going to use the Clock.
Add the state parameter to the useFrame:
useFrame((state) =>
{

})
In the state object, we have access to the clock property and we can call its elapsedTime method to save it in a time variable:
useFrame((state) =>
{
    const time = state.clock.getElapsedTime()
    console.log(time)
})
We now want to use time to rotate the spinner.
Unfortunately, there is a small issue. setNextKinematicRotation is expecting a Quaternion and not a Euler. Quaternions are harder to express and we can’t just write one directly.
To solve this, we are going to create a Three.js Euler, then create a Three.js Quaternion out of this Euler and since most mathematics objects are inter-compatible between Three.js and Rapier, we are going to send that Quaternion to setNextKinematicRotation.
Import THREE from three:
import * as THREE from 'three'Create the Euler version and use the time on the y axis:
useFrame((state) =>
{
    const time = state.clock.getElapsedTime()

    const eulerRotation = new THREE.Euler(0, time, 0)
})
Then create a Quaternion and apply the Euler using the setFromEuler method:
useFrame((state) =>
{
    const time = state.clock.getElapsedTime()

    const eulerRotation = new THREE.Euler(0, time, 0)
    const quaternionRotation = new THREE.Quaternion()
    quaternionRotation.setFromEuler(eulerRotation)
})
Finally, call setNextKinematicRotation method on the twister reference and send it the quaternionRotation:
useFrame((state) =>
{
    const time = state.clock.getElapsedTime()

    const eulerRotation = new THREE.Euler(0, time, 0)
    const quaternionRotation = new THREE.Quaternion()
    quaternionRotation.setFromEuler(eulerRotation)
    twister.current.setNextKinematicRotation(quaternionRotation)
})
Make it rotate faster by multiplying the time by 3 in the Euler:
useFrame((state) =>
{
    const time = state.clock.getElapsedTime()

    const eulerRotation = new THREE.Euler(0, time * 3, 0)

    // ...
})
Let’s take care of the position now.
We want the twister to follow a circle path on the surface of the floor and this is classic trigonometry.
Since it’s not the topic of the lesson, we are going to deal with the math only briefly, but still, take it step by step.
First, we need an angle and we are going to use the time multiplied by 0.5 so that it doesn’t move too fast:
useFrame((state) =>
{
    // ...

    const angle = time * 0.5
})
Then we need to calculate the x and z position using Math.cos() and Math.sin() on that angle:
useFrame((state) =>
{
    // ...

    const angle = time * 0.5
    const x = Math.cos(angle)
    const z = Math.sin(angle)
})
We can now use those values within the setNextKinematicTranslation method. Note that we don’t want to change the y value which is why we have to put back the initial value (- 0.8):
useFrame((state) =>
{
    // ...

    const angle = time * 0.5
    const x = Math.cos(angle)
    const z = Math.sin(angle)
    twister.current.setNextKinematicTranslation({ x: x, y: - 0.8, z: z })
})
It’s working, but the twister is moving along a small circular path. We can change that by multiplying both the sin and the cos:
useFrame((state) =>
{
// ...
const angle = time * 0.5
const x = Math.cos(angle) * 2
const z = Math.sin(angle) * 2
twister.current.setNextKinematicTranslation({ x: x, y: - 0.8, z: z })
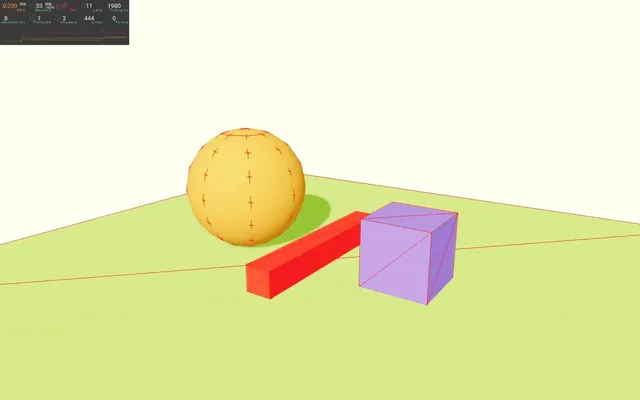
})And here’s our twister spinning all over the place and pushing objects to the edge like cats.
Events 01:29:43
We can listen to events by adding attributes directly on the <RigidBody>.
There are 4 different events:
onCollisionEnter: when theRigidBodyhit something.onCollisionExit: when theRigidBodyseparates from the object it just hit.onSleep: when theRigidBodystarts sleeping.onWake: when theRigidBodystops sleeping.
onCollisionEnter
In the Experience, create a collisionEnter function:
export default function Experience()
{
    // ...

    const collisionEnter = () =>
    {
        console.log('collision!')
    }
}
Then add it to the onCollisionEnter attribute of the <RigidBody> corresponding to the cube:
<RigidBody
    ref={ cube }
    position={ [ 1.5, 2, 0 ] }
    gravityScale={ 1 }
    restitution={ 0 }
    friction={ 0.7 }
    colliders={ false }
    onCollisionEnter={ collisionEnter }
>
    {/* ... */}
</RigidBody>
Let’s play a sound when the cube hits something.
First, we need to instantiate the audio. To do that, we are going to use useState in order to instantiate the audio only once in case the component is being re-rendered.
Import useState from react:
import { useState, useRef } from 'react'A hit.mp3 audio file is located in the /public/ folder.
Call useState at the beginning of Experience and send it a function that will return an instance of the Audio class:
export default function Experience()
{
    const [ hitSound ] = useState(() => new Audio('./hit.mp3'))

    // ...
}
We now have a sound ready to play.
In the collisionEnter function, set the currentTime to 0, set its volume to a random value, and play it. This way, the sound will replay from the beginning, in case two hits are triggered too quickly after one another and the volume randomness will make it sound more realistic:
const collisionEnter = () =>
{
    hitSound.currentTime = 0
    hitSound.volume = Math.random()
    hitSound.play()
}
Don’t forget that most browsers will prevent you from playing sounds if the user hasn’t interacted with the page first:
Click anywhere on the page before the cube hits something if you want to hear the sound:
Reinsert the console log again instead of the sound play:
const collisionEnter = () =>
{
    console.log('collision!')
    // hitSound.currentTime = 0
    // hitSound.volume = Math.random()
    // hitSound.play()
}
onCollisionExit
onCollisionExit will be triggered if the object separates from another object it just collided with.
Instead of creating a function, we can send one directly:
<RigidBody
    ref={ cube }
    position={ [ 1.5, 2, 0 ] }
    gravityScale={ 1 }
    restitution={ 0 }
    friction={ 0.7 }
    colliders={ false }
    onCollisionEnter={ collisionEnter }
    onCollisionExit={ () => { console.log('exit') } }
>
    {/* ... */}
</RigidBody>
onSleep and onWake
When an object stops moving for a moment, Rapier will consider it as sleeping and won’t update it unless it collides with something else or we call a function like applyImpulse on it.
This improves performance since Rapier won’t have to test objects that don’t move.
We can be informed of that sleeping state changing with onSleep and onWake:
<RigidBody
    ref={ cube }
    position={ [ 1.5, 2, 0 ] }
    gravityScale={ 1 }
    restitution={ 0 }
    friction={ 0.7 }
    colliders={ false }
    onCollisionEnter={ collisionEnter }
    onCollisionExit={ () => { console.log('exit') } }
    onSleep={ () => { console.log('sleep') } }
    onWake={ () => { console.log('wake') } }
>
		{/* ... */}
</RigidBody>
Let’s remove all of the events to prevent flooding the console, especially since we are going to do a stress test later that will create a lot of collisions:
<RigidBody
    ref={ cube }
    position={ [ 1.5, 2, 0 ] }
    gravityScale={ 1 }
    restitution={ 0 }
    friction={ 0.7 }
    colliders={ false }
    // onCollisionEnter={ collisionEnter }
    // onCollisionExit={ () => { console.log('exit') } }
    // onSleep={ () => { console.log('sleep') } }
    // onWake={ () => { console.log('wake') } }
>
    {/* ... */}
</RigidBody>
From a model 01:38:25
Let’s see how React Three Rapier handles models.
Load the model
First, we need to add a model to our scene. The usual hamburger is available in the /public/ folder.
Now would be a good time to try to load the hamburger and add it to the scene yourself. Then you can try to add physics to it and see how it’s being handled.
Let’s do it together.
Import useGLTF from @react-three/drei:
import { useGLTF, OrbitControls } from '@react-three/drei'Use it to load the model:
export default function Experience()
{
    // ...

    const hamburger = useGLTF('./hamburger.glb')

    // ...
}
And add it with a <primitive> inside <Physics>:
<Physics debug gravity={ [ 0, - 9.08, 0 ] }>

    {/* ... */}

    <primitive object={ hamburger.scene } />

</Physics>
Let’s scale it down a little:
<primitive object={ hamburger.scene } scale={ 0.25 } />
Add physics
And now, the moment of truth, add a <RigidBody> around it:
<RigidBody>
<primitive object={ hamburger.scene } scale={ 0.25 } />
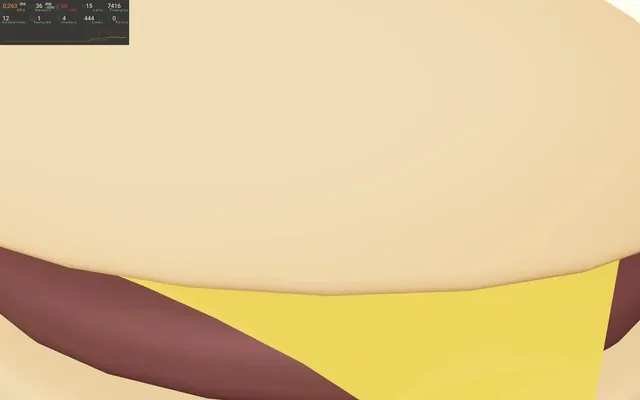
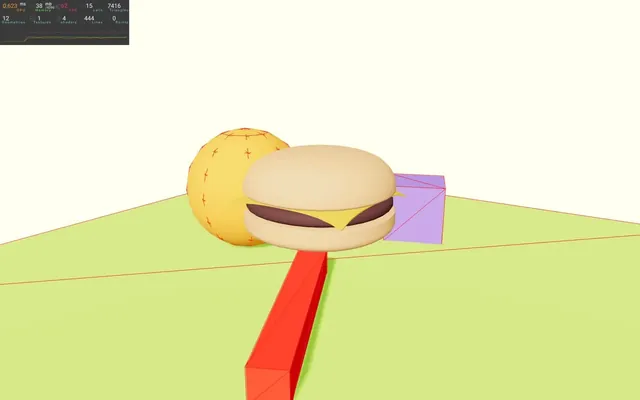
</RigidBody>It’s working!
In order to see it more clearly, let’s move it up above the cube and the sphere with the position attribute:
<RigidBody position={ [ 0, 4, 0 ] }>
    <primitive object={ hamburger.scene } scale={ 0.25 } />
</RigidBody>
As you can see from the debug, a CuboidCollider has been created for each part of the hamburger and it works quite nicely.
Use a custom collider
But those cuboids don’t really match the shape of our hamburger.
A first solution could be to create our own custom collider.
Set the colliders attribute of the <RigidBody> to false:
<RigidBody colliders={ false } position={ [ 0, 4, 0 ] }>
    {/* ... */}
</RigidBody>
A cylinder would fit quite nicely.
Import CylinderCollider from @react-three/rapier:
import { CylinderCollider, BallCollider, CuboidCollider, RigidBody, Physics } from '@react-three/rapier'Add the <CylinderCollider> to the <RigidBody>:
<RigidBody colliders={ false } position={ [ 0, 4, 0 ] }>
    <primitive object={ hamburger.scene } scale={ 0.25 } />
    <CylinderCollider args={ [ 0.5, 1.25 ] } />
</RigidBody>
In the video, the debug version of the cylinder doesn’t match the actual shape of the collider, but it should be fine for you.
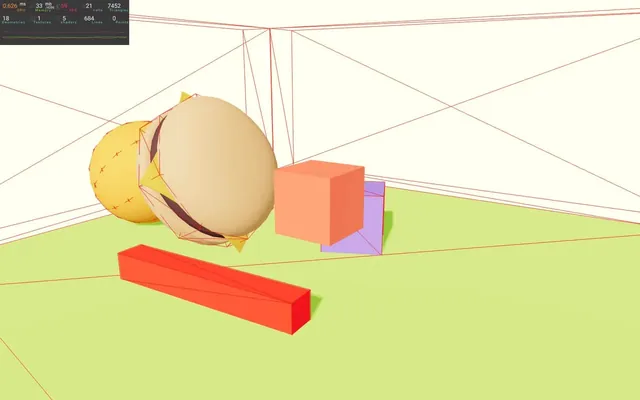
Use a hull
In most cases, you don’t need the collider to match the geometry perfectly and most users won’t notice the difference (especially gamers that are used to it).
Still, let’s push the realism a bit further.
Comment the <CylinderCollid> and set the colliders attribute to hull:
<RigidBody colliders="hull" position={ [ 0, 4, 0 ] }>
    <primitive object={ hamburger.scene } scale={ 0.25 } />
    {/* <CylinderCollider args={ [ 0.5, 1.25 ] } /> */}
</RigidBody>
React Three Rapier will create a hull for each part of the hamburger. Unfortunately, as I’m recording, it seems that the center of the mass isn’t quite right. This bug will probably get fixed soon and you might not even see it.
Use a trimesh
And finally, we can set the colliders attribute to trimesh:
<RigidBody colliders="trimesh" position={ [ 0, 4, 0 ] }>
    <primitive object={ hamburger.scene } scale={ 0.25 } />
    {/* <CylinderCollider args={ [ 0.5, 1.25 ] } /> */}
</RigidBody>
Don’t forget that using trimesh on a dynamic object might result in collision bugs, but the shape will match the geometry perfectly.
Let’s set the colliders to false and reinsert the <CylinderCollider>:
<RigidBody colliders={ false } position={ [ 0, 4, 0 ] }>
<primitive object={ hamburger.scene } scale={ 0.25 } />
<CylinderCollider args={ [ 0.5, 1.25 ] } />
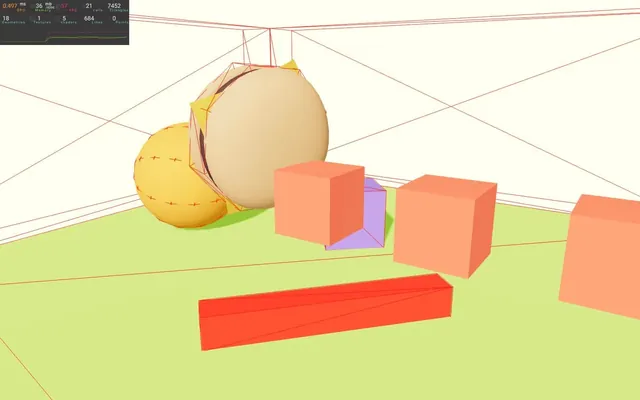
</RigidBody>Stress test 01:45:19
We are almost done with these lessons. But to finish on a high note, let’s see how Rapier handles hundreds of cubes falling from the sky.
Adding walls
And to spice things up even more, we are going to prevent objects from falling out of the scene.
To do that, we are going to add invisible walls.
Until now, we have been adding meshes or models inside the <RigidBody>, but this is not mandatory. Our walls will exist in Rapier but not in Three.js.
You can actually try to create those walls yourself.
Here’s the solution:
<RigidBody type="fixed">
    <CuboidCollider args={ [ 5, 2, 0.5 ] } position={ [ 0, 1, 5.5 ] } />
    <CuboidCollider args={ [ 5, 2, 0.5 ] } position={ [ 0, 1, - 5.5 ] } />
    <CuboidCollider args={ [ 0.5, 2, 5 ] } position={ [ 5.5, 1, 0 ] } />
    <CuboidCollider args={ [ 0.5, 2, 5 ] } position={ [ - 5.5, 1, 0 ] } />
</RigidBody>
InstancedMesh
Since we want to test Rapier’s limits, we need to make sure that Three.js can handle hundreds of cubes. To do that, we are going to use the InstancedMesh.
We’ve already talked about the InstancedMesh in the Performance tips lesson, but we need to learn how to implement it in React Three Fiber. Let’s put Rapier aside for a moment.
First, we need to add an <instancedMesh> to our JSX:
<Physics debug gravity={ [ 0, - 9.08, 0 ] }>

    {/* ... */}

    <instancedMesh>
    </instancedMesh>

</Physics>
We need to provide 3 arguments for it. The geometry, the material, and the number of instances we are going to show.
Since we are going to create the geometry and the material with in declarative using R3F, we can set those to null, but we do need to provide the number of instances.
We are going to save the number of cubes as cubesCount:
export default function Experience()
{
    // ...

    const cubesCount = 3

    // ...
}
And provide it as the third value of args while the first two are null (do not save yet):
<instancedMesh args={ [ null, null, cubesCount ] }>
</instancedMesh>
Then, we can create the <geometry> and the <material> like we do for a <mesh>:
<instancedMesh args={ [ null, null, cubesCount ] }>
    <boxGeometry />
    <meshStandardMaterial color="tomato" />
</instancedMesh>
Now, we need to provide a Matrix4 for each instance and we are going to do that through a reference.
Make sure that you’ve imported useRef from react:
import { useState, useRef } from 'react'Create a cubes (with an s) reference:
export default function Experience()
{
    // ...

    const cubes = useRef()

    // ...
}
And associate it with the <instancedMesh> using the ref attribute:
<instancedMesh ref={ cubes } args={ [ null, null, cubesCount ] }>
    {/* ... */}
</instancedMesh>
We only want to provide the matrices on the first render and we are going to use useEffect to do that.
Import useEffect from react:
import { useEffect, useState, useRef } from 'react'Call it in Experience with an empty array as the dependencies:
export default function Experience()
{
    // ...

    useEffect(() =>
    {

    }, [])

    // ...
}
Let’s do a for loop from 0 to cubesCount (excluded):
useEffect(() =>
{
    for(let i = 0; i < cubesCount; i++)
    {

    }
}, [])
To begin with, we are going to create an empty Matrix4 and we already imported THREE:
import * as THREE from 'three'We can instantiate the Matrix4 in the for loop:
useEffect(() =>
{
    for(let i = 0; i < cubesCount; i++)
    {
        const matrix = new THREE.Matrix4()
    }
}, [])
And to associate each one of the Matrix4 to the instances of the InstancedMesh, we can use the setMatrixAt method:
useEffect(() =>
{
    for(let i = 0; i < cubesCount; i++)
    {
        const matrix = new THREE.Matrix4()
        cubes.current.setMatrixAt(i, matrix)
    }
}, [])
You should see one tomato cube at the center. There are actually 3 of them, but they are all positioned at the center since we provided an empty Matrix4.
Without going too much into detail, Matrix4 is a combination of position, rotation, and scale. They are used to move the vertices according to the object transformation. When we change the position, rotation, or scale of an object, Three.js will calculate the Matrix4 of that object automatically right before rendering it.
But here, we need to do it ourselves and there are many different methods available on Matrix4 to do that.
One of them is compose, to which we need to send a position (Vector3), a rotation (Quaternion), and a scale (Vector3):
useEffect(() =>
{
    for(let i = 0; i < cubesCount; i++)
    {
        const matrix = new THREE.Matrix4()
        matrix.compose(
            new THREE.Vector3(i * 2, 0, 0),
            new THREE.Quaternion(),
            new THREE.Vector3(1, 1, 1)
        )
        cubes.current.setMatrixAt(i, matrix)
    }
}, [])
And that’s how we handle InstancedMesh in R3F.
Those tomato cubes are being rendered in one draw call and we could create hundreds of them at minimal performance cost.
We can also activate shadows with the usual castShadow and receiveShadow attributes:
<instancedMesh ref={ cubes } castShadow receiveShadow args={ [ null, null, cubesCount ] }>
    {/* ... */}
</instancedMesh>
Back to the physics
Now that we know how to implement <instanceMesh>, let’s see how we can use it with React Three Rapier.
First of all, we need to wrap our <instanceMesh> inside a <InstancedRigidBodies>.
Import InstancedRigidBodies from @react-three/rapier:
import { InstancedRigidBodies, CylinderCollider, BallCollider, CuboidCollider, RigidBody, Physics } from '@react-three/rapier'And wrap <instanceMesh> with <InstancedRigidBodies>:
<InstancedRigidBodies>
    <instancedMesh ref={ cubes } castShadow receiveShadow args={ [ null, null, cubesCount ] }>
        <boxGeometry />
        <meshStandardMaterial color="tomato" />
    </instancedMesh>
</InstancedRigidBodies>
<InstancedRigidBodies> will take care of creating and sending the matrices to <instancedMesh>. For this reason, we can get rid of the cubes reference and the useEffect with the for loop inside (keep the cubesCount):
const cubesCount = 3
// const cubes = useRef()

// useEffect(() =>
// {
//     for(let i = 0; i < cubesCount; i++)
//     {
//         const matrix = new THREE.Matrix4()
//         matrix.compose(
//             new THREE.Vector3(i * 2, 0, 0),
//             new THREE.Quaternion(),
//             new THREE.Vector3(1, 1, 1)
//         )
//         cubes.current.setMatrixAt(i, matrix)
//     }
// }, [])
And don’t forget to remove the ref attribute from <instancedMesh>:
<InstancedRigidBodies>
    <instancedMesh castShadow receiveShadow args={ [ null, null, cubesCount ] }>
        {/* ... */}
    </instancedMesh>
</InstancedRigidBodies>
To handle the instances on <InstancedRigidBodies>, we need to create an array and put an object inside for each instance we want. We want to do that only once and keep the value if the component re-render. To do that, we are going to use useMemo:
Import useMemo from react:
import { useMemo, useEffect, useState, useRef } from 'react'Call useMemo and return an instances array:
const cubesCount = 3
const instances = useMemo(() =>
{
    const instances = []

    return instances
}, [])
Although instances is empty, we can already send it to <InstancedRigidBodies> as the instances attribute:
<InstancedRigidBodies instances={ instances }>We can now fill the instances array by pushing an object inside for each cube we want.
Each objects needs 3 properties:
key: a random key (used by React)position: an array composed of 3 values for a Vector3 position (x,yandz)rotation: an array composed of 3 values for an Euler rotation (x,yandz)
const cubesCount = 3
const instances = useMemo(() =>
{
    const instances = []

    for(let i = 0; i < cubesCount; i++)
    {
        instances.push({
            key: 'instance_' + i,
            position: [ i * 2, 0, 0 ],
            rotation: [ 0, 0, 0 ],
        })
    }

    return instances
}, [])
And that’s all it takes.
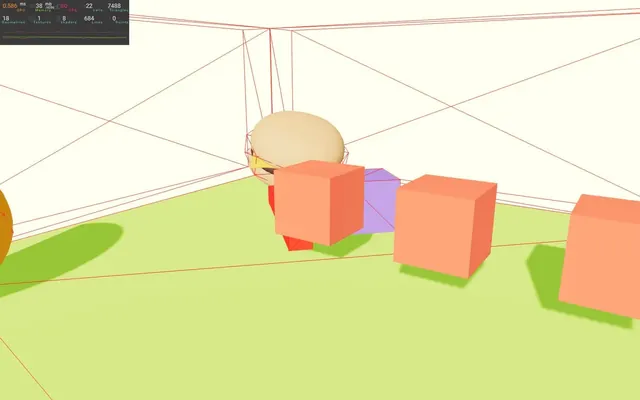
We can now have some fun. Add more cubes and more randomness in their position and rotation:
const cubesCount = 100
const instances = useMemo(() =>
{
    const instances = []

    for(let i = 0; i < cubesCount; i++)
    {
        instances.push({
            key: 'instance_' + i,
            position:
            [
                (Math.random() - 0.5) * 8,
                6 + i * 0.2,
                (Math.random() - 0.5) * 8
            ],
            rotation: [ Math.random(), Math.random(), Math.random() ],
        })
    }

    return instances
}, [])
But we’ve made a mistake and you might notice that the performance isn’t that great depending on your computer.
We forgot to deactivate the debug mode on <Physics> and all those wireframes take time to render.
Set the debug attribute to false:
<Physics debug={ false } gravity={ [ 0, - 9.08, 0 ] }>

    {/* ... */}

</Physics>
Go crazy, but please don’t burn your computer.
Going further 02:09:18
And that concludes our lessons.
Our knowledge of cannon.js and the ease we get from using React Three Fiber and React Three Rapier made it possible to learn so many features in one lesson.
Still, you can go further.
First, we’ve put everything in the same component, but don’t forget to split your code into multiple components in order to make things easier to understand and maintain.
Don’t forget to check the examples on React Three Fiber: https://docs.pmnd.rs/react-three-fiber/getting-started/examples. The most relevant ones should be available here.
There is a whole topic about Rapier that we didn’t cover and that’s the Joints. Joints let you create articulations. You can create tentacles, ropes, robot arms, etc.
Don’t forget to keep an eye on updates from both Rapier and React Three Rapier. As we’ve mentioned earlier, React Three Rapier is still under development and might change for the better.